SEED CONSERVATION IN TASMANIA
Tasmanian Seed Collection Centre
Conservation of Tasmanian seeds

Main laboratory of the Tasmanian Seed Conservation Centre.
The Tasmanian Seed Conservation Centre (TSCC) is a seed banking facility located in a purpose-built laboratory at the Royal Tasmanian Botanical Gardens. Established in 2005, the TSCC has become the cornerstone of the Botanical Gardens conservation strategy.
The TSCC is a product of the Joint Tasmanian-Millennium Seed Bank Project, a project resulting from collaboration of:
- The Royal Tasmanian Botanical Gardens;
- The Tasmanian Herbarium;
- The Resource Management and Conservation Division of DPIPWE; and
- The Seed Conservation Department of the Royal Botanic Gardens, Kew (UK).
The International Millennium Seed Bank Project
Kew’s Seed Conservation Department in the UK is home to a global conservation program known as the Millennium Seed Bank Project (MSBP). This highly ambitious project aims to collect and bank seeds of around 24,200 species by the end of 2009. To meet this goal the MSBP jointly funds seed banking activities in around 36 different countries around the world, including Australia.

The Millennium Seed Bank at the Royal Botanic Gardens, Kew, Wakehurst Place in the UK.
The TSCC and ‘SeedSafe’
The TSCC will ensure the long-term security and conservation of Tasmania’s unique native plant species by providing:
- Ex situ support for plant conservation programs;
- Seed material to assist in the scientific study of our native plants; and
- Long term preservation of plant biodiversity loss caused by environmental degradation.
The Tasmanian members of the MSBP are collectively referred to as ‘SeedSafe‘. By the beginning of 2010 the SeedSafe group aimed to:
- Collect and conserve 800 plant species native to Tasmania; and
- Collect and conserve at least 60% of Tasmania’s threatened flora.
Close of MSBP and the future
By the close of the MSBP the Kew seedbank had surpassed it’s target of 24,200 species and collections continue to be added (more information on Kew’s seed numbers here). In the first quarter of 2010 SeedSafe had made over 1,100 collections and held 56% of Tasmania’s threatened flora.
The RTBG has now committed itself to holding 75% of our Threatened flora by 2020, in accordance with the current revision of the Global Strategy for Plant Conservation.
Basic activities
Target species are identified before seeds are collected from naturally occurring populations in the wild. Back at the TSCC, seeds are carefully cleaned, dried, sealed in packages and stored at -20°C.
The SeedSafe program and TSCC will greatly enhance our knowledge of Tasmania’s native flora, of which little is currently known. By collecting seeds in situ, as well as field data and herbarium specimens, testing seed viability, uncovering germination requirements and propagating plants, we expect to uncover a great deal about Tasmanian plant life-cycles, germination ecology and environmental impacts.
‘Back-up’ collections for Tasmania
Half of each seed collection made in Tasmania is stored in the TSCC, while the other half is sent to the MSBP in the UK as part of the
global seed conservation effort. This collection is also an important ‘back up’ for the collection remaining in Tasmania.
Seedbank staff

Seed collector Micah Visoiu recording field data in Mt Field National Park, Tasmania. Field data is vital to the long-term value of a seed collection.

Seed Bank coordinator James Wood supervising the cleaning of Spyridium parviflorum with volunteer Lorraine Cotter.
During the MSBP funded stage seed collection was carried out by Micah Visoiu from the Resource Management and Conservation Division of the Department of Primary Industries and Water, with the assistance of other staff and suitably qualified volunteers.
Operation of the TSCC is overseen by the Seed Bank Coordinator, James Wood. A team of volunteers also assist in cleaning seeds in preparation for banking and germination testing.
All collections are catalogued in the TSCC database. This database holds each collection’s associated field data and the results of all seed germination tests carried out by the TSCC and other parties.
TSCC germination data is available to the public in the TSCC Germination Database.
Seed Collecting

Figure 1. Collecting seed is often a difficult and strenuous process. Seed collector Micah Visoiu (centre) harvesting Zoysia macrantha on Flinders Island with the assistance of Alex Buchanan of the Tasmanian Herbarium and volunteer Esther Brüllhardt. Photograph courtesy of Naomi Lawrence (DPIW).
The collection of high quality, fully ripened seeds from wild plant populations requires careful, on-the-spot decision making. Seed collectors need good judgment, training and experience, and in many cases an intimate knowledge of the plant species.
Conservation collections
A seed collection made for conservation purposes is far more than just a packet of dry seeds in a freezer. The value of any seed collection relies on information regarding which plant species they came from, where the collection was made and at what time of year. This kind of information is vital for any potential use of the seeds in future years, therefore careful data recording in the field, at the time of collection is extremely important.
Herbarium specimens
Once it is decided that a plant population is suitable to make a conservation seed collection from, a set of herbarium specimens are required. This is crucial for the species to be positively identified. A herbarium specimen is usually a pressed and dried adult plant specimen. In seed collecting this is known as a voucher specimen and is forever associated with that seed collection. A voucher specimen ensures that if any future taxonomic revision takes place, the voucher specimen can be re-examined to determine the exact taxon of the seed collection.
For example consider a collection of a poorly understood species held in a seed bank. Several years after collection the “species” is recognised as being two very similar species. At this point the voucher specimen can be reviewed to determine whether a name change for the seed collection is necessary.
All material collected by the ‘SeedSafe’ project is verified by the Tasmanian Herbarium. Currently ‘SeedSafe’ collects three voucher specimens for every seed collection made; one for the Tasmanian Herbarium, one for the Kew Herbarium (the MSBP) in the UK and the third is sent to an institution working on the taxonomic group.
Field data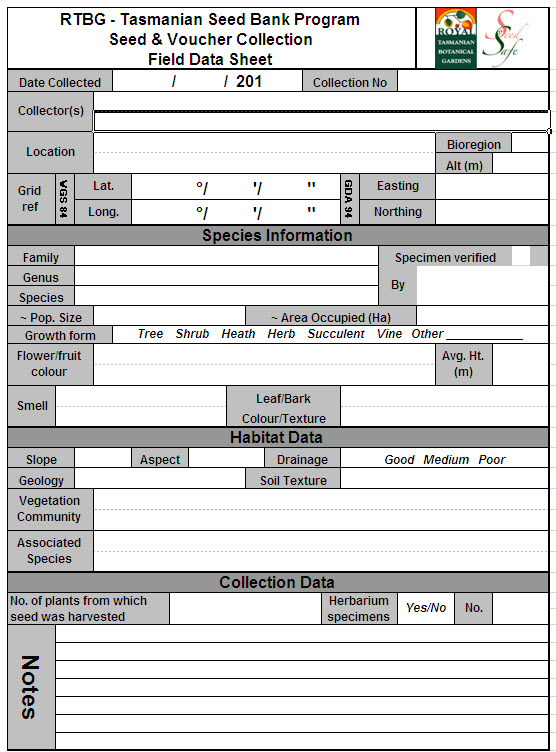
Whenever a seed collection is made, important field data is collected regarding the plant species, the location of collection, the habitat, the plant population size and the number of plants collected from. This meta-data is recorded on a collecting sheet (fig. 2), which is kept along with the seed collection. All this information is also stored on a database. Without this meta-data the seed collection is of very little use.
To collect or not to collect; that is the question.
One of the biggest logistical challenges for a seed collector is ensuring that they are in the right place at the right time to collect seeds. It is well understood that the seeds of most plants reach their peak of maturity, viability and potential longevity at the point of natural dispersal. Collecting too early or too late can result in collections with poor long-term storage potential. Therefore collecting seeds at the peak of ripeness is one of the most fundamental aspects of seed collecting.
Indications of seed maturation include:
- Seeds become loose in capsules and capsules start to open.
- Berries and other ‘wet’ fruits take on distinct colours and become easier to detach from the plant.
- The seed contents are usually firm and uniform in colour.
- Seeds start naturally dispersing from the plant.
These indications, and many others, are important for a seed collector. Not only do they help to determine when to collect but they are also useful in determining a method for collection.

Figure 3. A model of seed development, maturation and dispersal in a plant bearing dessication-tolerant seeds. Figure courtesy of the MSBP.
Maximising seed longevity
Figure 3 details the developmental phases of seeds leading up to dispersal. You can see that the potential longevity (the ability of seeds to survive for a long time) is at its peak for only a short period of time coinciding with the dispersal stage. This is the optimum time to collect. After dispersal, natural fluctuations in humidity and temperature will begin to age seeds, reducing their longevity.
Post-harvest maturation
Under certain circumstances it is possible to collect seeds a few weeks prematurely and allow post-harvest maturation to take place ex situ in a humidity controlled chamber. This technique however is far from perfect and in most cases some reduction in seed viability and longevity should be expected. Nevertheless this technique can be hugely valuable when access to fruiting material is extremely difficult and collecting opportunities are rare.
How many to collect?
For the purposes of long-term seed conservation, seed collections must be relatively large in order to adequately represent the genetic diversity of the local population.
A good conservation seed collection should contain between 10,000 to 20,000 viable seeds. Collections should also be sampled evenly from 50 or more individuals to ensure a thorough genetic representation of the population.
However, it is very important that harvesting does not impact heavily on the natural breeding strategy of the plant population. This is particularly important if the species is rare or threatened.
Therefore as a general rule it is recommended that no more than 20%of the available ripe seed be collected from any one population in any one season.
When confronted with a plant in fruit it is very important to ascertain how much seed is available:
- How big is the population?
- How many seeds per fruit?
- How much full seed is being produced?
- Is the population pure?
In many cases when these questions are asked it will be determined that there is little use in collecting the seed.
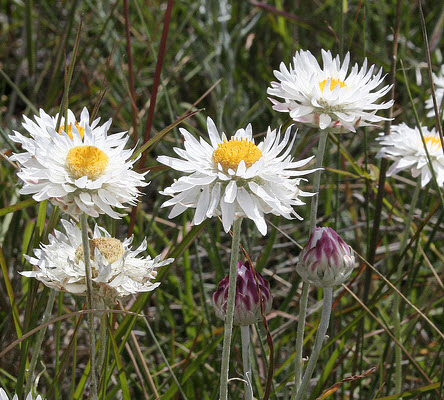
Leucochrysum albicans (Asteraceae, fig. 4). More information
For example, consider seed collection of the grassland paper daisy Leucochrysum albicans (Asteraceae, fig. 4). This species is endangered within Tasmania and an ‘obligate seeder’ i.e. it relies heavily on seed production to rejuvenate its population for the following year. It was therefore vital when collecting L. albicans seeds that at least 80 to 90% of the available seed was left in situ.
Other plants, such as Acacia species (Mimosaceae), work up large soil seed banks containing physically dormant seeds that can survive for decades under the soil surface before germinating. In such cases the seed crop of any one year is not nearly so important to the population.
Checking seed viability in the field

Figure 5. Full and empty seeds in the fruits of Stilbocarpa polaris (Asteraceae). In cases like this it is difficult to avoid empty seeds.
Before making a collection it is necessary and relatively easy to assess the viability of the seeds by performing a simple cut-test in the field. Viability is determined by cutting the seed open and examining the contents. In particular, the seed embryo must appear intact and healthy and the endosperm must appear clean and firm (fig. 5), which can be confirmed through seed viability testing.
How to collect
The best collecting method should result in a collection with the highest quality seed available and the minimum amount of debris. Seeds of many species ripen over a period of time and there are often both mature and immature seeds present on the same plant at the same time. Collecting the ripe seeds whilst avoiding the immature ones will greatly enhance the final quality of the collection.
Some practical seed collection methods include:
- Striping – A technique used for grasses, but also useful for plants with small fleshy fruits. When grass seeds mature they separate more readily from the parent plant. By running the infrutescence through the hand or fingers whilst applying gentle pressure, mature seeds can be harvested and immature seeds left behind.
-
Shaking – For small herbs this can mean shaking seed capsules over a bag. For trees and shrubs, branches can be shaken whilst a bag or a sheet (or shower curtain) are held underneath to catch the seeds (fig. 6).
- Pruning – For many species this is the most practical way to collect seeds. Secateurs or in some cases pole pruners can be used to prune off small branches which have many fruit attached. This technique is commonly used for species with dry capsules. On drying out, the seeds are shed and the branches can just be shaken and removed leaving the seed and associated structures. This approach can also be used for tough stemmed species with dry dehiscent and/or fluffy fruits.
- Picking – Similar to pruning but without the secateurs, this technique is useful for larger fleshy or dry fruit and the larger herbaceous daisy flowers.
- Vacuuming – a small hand held rechargeable vacuum cleaner can be incredibly useful for collecting loose seeds from small prostrate species, reducing collecting time from many hours to a few minutes (fig. 7). It also however delivers a fine soil collection and an interesting entomological collection; as do many other methods.

Figure 6. Exocarpus strictus (Santalaceae) fruits caught in a shower curtain. Photograph courtesy of Micah Visiou (DPIW).

Figure 7. Vacumning Rytidosperma (Poaceae) seeds in Mt William National Park, Tasmania.
 Remember hygiene when you go into the wild
Always Check, Clean, Disinfect, Dry
Seed Drying & Cleaning
Once harvested, the ‘post-harvest handling’ of a seed collection can seriously affect the quality and longevity of the seeds.
Drying seeds is critical
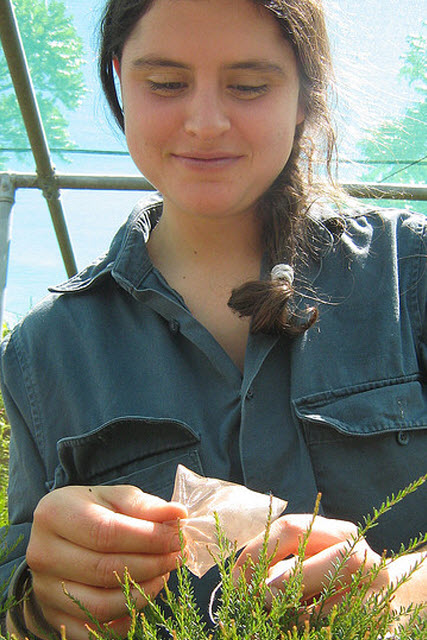
Figure 1. Collecting good quality seeds takes time and effort. Protecting this investment requires careful post-harvest seed handling
Seed collections made in the field need to be transported to the TSCC as quickly as possible. At the point of natural dispersal most seeds contain too much moisture for seed bank storage. Drying seeds down and maintaining low seed moisture content is critical in order to maximise seed viability and longevity 1.
Seed moisture content (as well as temperature) determines the rate at which seeds lose viability and die. The vast majority of seeds maintain greater viability when dry. A useful rule of thumb is that seed longevity approximately doubles for every 10% reduction in relative humidity (RH)2. Therefore knowing the moisture status of seeds is crucially important in seed conservation.
Storing seeds at 15°C and 15% RH
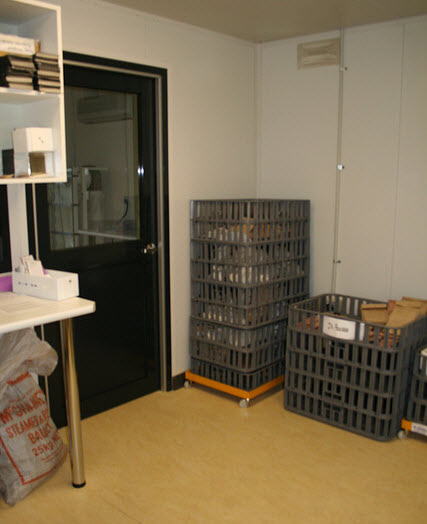
Figure 2. Seed collections in the TSCC drying room. Collections are held in cloth/paper bags or paper envelopes and placed in slatted plastic crates. This allows good air flow around the collections and ensures rapid drying.
Once collections arrive at the TSCC, they are usually placed immediately in the drying room (fig. 2). The drying room is maintained at 15°C and 15% RH, an internationally-accepted regime for drying seed collections1.
Dry seeded material collected in the field is placed directly into the drying room. However wet fruit and berries are tackled differently. Seeds, stones, pyrenes, etc. need to be extracted from wet fruit as soon as possible (fig. 3). Wet fruits are pulped in a sieve and washed with warm water to remove the fleshy tissue. Once the fruit pulp is removed, the extracted seeds can be placed in the drying room.

Figure 3. Fleshy fruited collections like these need to be processed immediately to extract the seeds easily.
Seeds are ‘hydroscopic’
All seeds are hygroscopic, including those with physical dormancy once the seed coat has been chipped. This means that they automatically absorb or desorb moisture from the surrounding air by diffusion. If the seed contains more moisture than the surrounding air, the seed will lose water and become drier, and if the seed conatins less moisture then the air it will absorb water. Absorption or desorption of water occurs until the seed is in equilibrium with the surrounding air.
Poorly dried seeds can age rapidly
Slow gradual gain of moisture from the air by dry seeds can accelerate seed ageing and result in a rapid loss in seed viability. It is important then that dried seeds be kept dry.
Dry seeds can be frozen
Placing seeds in a 15% RH environment causes them to gradually dry down to approximately 15% RH. Not only does this maximise seed longevity while in storage, but it is also sufficiently dry enough for seeds to be stored at -20°C without harmful ice crystals forming and destroying delicate seed tissue.
Cleaning up collections

Figure 4. Seed Bank coordinator James Wood supervising the cleaning of Spyridium parviflorum (Rhamnaceae) with volunteer Lorraine Cotter.
Cleaning of dry seeds takes place as soon as possible and has two main aims:
- To reduce collection bulk as much as possible (e.g. surplus plant material and large bulky seed covering structures are removed).
- To remove empty or infested seeds (this significantly improves the quality of the collection and also improves the longevity of the collection in storage).
The cleaning process can significantly increase the overall viability and longevity of a seed collection, if carried out correctly. During the cleaning process, seed samples are regularly examined for quality and to determine when an optimal end point in the cleaning process has been reached.
Once dry, cleaning a seed collection can take anywhere between 10 minutes to 60+ hours to complete, but the majority of collections can be processed within 1-2 hours. Meanwhile seeds are continually stored at 15°C and 15% RH in preparation for banking at -20°C.
At the TSCC, dedicated volunteers help prepare seed collections for banking (fig. 4).
The TSCC uses a number of paper trays, boats and envelopes to handle and store seed. Click here to view RTBG_SeedBank_Origami instructions on how to build trays, boats and envelopes.
References:
- Probert RJ. 2003. Seed viability under ambient conditions and the importance of drying. In: Seed Conservation. Turning Science into Practice. RD Smith, JB Dickie, SH Linington, HW Pritchard and RJ Probert, eds. Royal Botanic Gardens Kew, 337-365.
- Roberts EH and Ellis RH. 1989. Water and seed survival. Annals of Botany 63: 39-52.
Seed Viability Tests
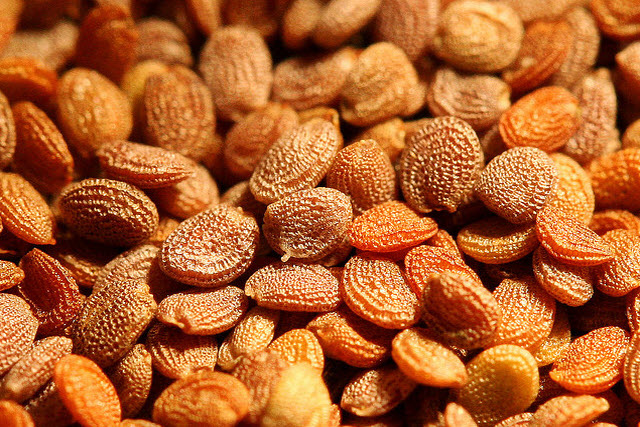
Figure 1. Rorippa gigantea (Brassicaceae) seeds. Collections can often appear healthy and viable, but are they?
There is little value in storing poor quality or empty seeds in a seed bank. The aim of the seed cleaning process, followed by the viability and germination tests, is to ensure that each collection held in long-term storage is of a very high quality given the time and resources available.
Initial viability testing; quality control
If a seed is viable (i.e. living) then it is worth banking for future use. To check that seed collections are viable, a small proportion of each collection is tested for viability before seeds are banked.
At the TSCC, seed viability is assessed via a ‘cut test’, however other seed banks use techniques such as x-ray analysis and/or the ‘tetrazolium chloride (TZ) staining test’.
The cut test
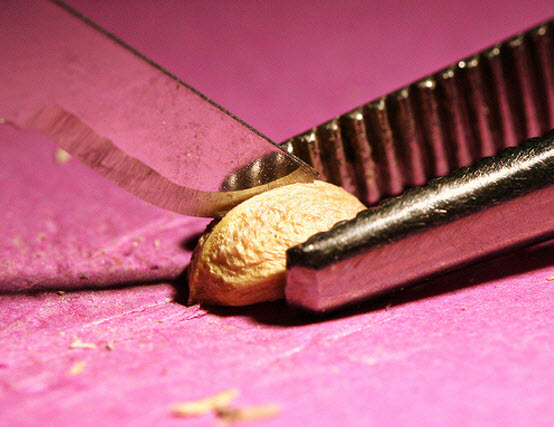
Cut testing pyrenes of Coprosma hirtella. All collections stored by the seed bank have a quality assessment made by dissecting a randomly chosen sample of seeds.
The cut test is simple and easily executed. Viability is determined by cutting the seed open and examining the contents. In particular, the seed embryo must appear intact and healthy if the seed
is to go on and germinate. In addition, the endosperm must appear clean and firm1.
The cut test would appear quite straightforward, however even this technique can be challenging when working with the seed of wild plant species. Seeds vary quite considerably in length from <1mm to several centimetres. Dissection of tiny seeds requires delicate execution with precision tools and examination requires a good microscope. To further complicate matters the internal morphology of seeds is highly variable (fig. 3), and colour and texture of storage tissue (cotyledons and endosperm) is influenced by the storage compounds used by the seed. So an appearance that indicates high viability in one species can indicate low viability in another. Learning to differentiate ultimately comes with experience.
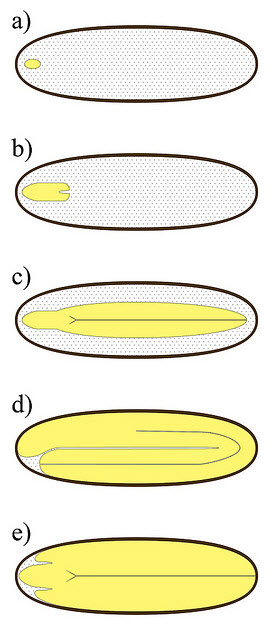
Figure 3. Illustration showing a small sample of the variation observed in internal seed morphology. Seed embryo are yellow. Shaded white is endosperm.
- Tiny Undifferentiated embryo (e.g. Ranunculaceae)
- Small differentiated embryo (e.g. Apiaceae)
- Linear embryo (e.g. Oleaceae)
- Bent embryo (e.g. Brassicaceae)
- Large investing embryo (e.g. Mimosaceae)
Other techniques
X-ray analysis
For seed workers with access to an x-ray machine, x-ray analysis can be a very efficient and non-destructive method of assessing seed quality1. A good x-ray image will reveal details of seed fill, insect infestation and also size or absence of the embryo. To a lesser degree it may also reveal variation in storage tissue quality. However, this method is not as revealing as the simple cut-test.
The TZ test
Seed viability can also be determined over three consecutive days with the tetrazolium chloride (TZ) staining technique2. Hydrated seeds are perforated and placed overnight into a solution of tetrazolium chloride. This compound is colourless until in the presence of living tissue when it is converted to a red dye. This causes living tissue to stain red. Seed staining patterns are examined the following day to determine percentage seed viability.
Usually only uniformly stained red / dark pink embryos are considered ‘viable’. However, staining patterns must be interpreted carefully and, depending on the species and the level of viability, the TZ test can be highly subjective.
References:
- Terry J, Probert RJ and Linington SH. 2003. Processing and maintenance of the Millennium Seed Bank collections. In: Seed Conservation. Turning Science into Practice. RD Smith, JB Dickie, SH Linington, HW Pritchard and RJ Probert, eds. Royal Botanic Gardens Kew, 307-325.
- International Seed Testing Association (ISTA). 2003. ISTA Working Sheets on Tetrazolium Testing. Vols. I and II. ISTA, Bassersdorf, Switzerland.
Germination Tests at the TSCC
The germination of seeds is the ultimate measure of viability of any seed collection. It can also be argued that there is little point storing seeds for the future if we don’t know how to germinate them. Therefore successful germination testing is critical to the function of any seed bank. For this reason the TSCC, like other seed bank programs, aims to determine and record the germination requirements for each seed collection it receives (fig. 1).

Figure 2. Rytidosperma laeve (Poaceae) germinating on 1% agar at 20°C.
Petri dishes and agar
The majority of germination tests performed by the TSCC are carried out in 9 cm diameter plastic Petri dishes containing 1% agar-water (a gel of 99% water, fig. 1&2). Petri dishes are stacked inside plastic bags to avoid water evaporation, and these bags are then placed in germination incubators.
Occasionally other compounds are added to the agar gels. Most commonly a very small amount of Potassium Nitrate is added. Very infrequently we have added gibberellins to the germination media. Gibberellins are a group of plant growth regulators (colloquially referred to as plant hormones) that are strongly implicated in the germination process. Our usage of gibberellins is sparing as they are expensive with a limited value in resolving dormancy requirements and are only been used where time/mission critical seedlings of problematic taxa have been required for research purposes.
Germination Incubators

Figure 3. Germination curves generated by the TSCC for Juncus pauciflorus (Juncaceae). Click image for more details.
As of February 2015 the TSCC has ten germination incubators. Six incubators run at 5°C, 10°C, 15°C, 20°C, 25°C and 30°C constant temperatures and the remaining four run at alternating temperature regimes of 12/0°C, 17/05°C, 22/10°C and 27/15°C. Alternating temperature regimes simply attempt to mimic natural day/night temperature fluctuations. Light is provided by fluorescent tubes for 10 hours each day, and in the case of alternating temperature regimes, light will coincide with the warmest temperature. The choice of a 10 hours light /14 hours dark photoperiod was made to roughly approximate day length during the Tasmanian Autumn and Spring period; when we would expect the bulk of seed germination in Tasmania to take place.
To learn more about germination testing read “Germinating seeds for the first time“.
Scoring germination
Every seven days the number of germinated seeds is recorded and the percentage germination calculated. This is known as ‘scoring’ and enables germination curves to be plotted at the end of the germination test (fig. 3). On average, a TSCC germination test will run for 56 days, but about 40 % of tests run for up to 112 days, and the occasional test has been known to run for over 20 months.
At the end of a germination test, any non-germinated seeds are assessed using the cut test. Empty or infested seeds are excluded when calculating the overall percentage germination.

Figure 4. Mouldy seeds of Austrostipa flavescens (Poaceae) sprouting. Fungal infection on the coats of seeds are common but if the seed is healthy this is not a problem.
In theory, germination percentages should not be significantly different to estimated viability percentages. Viable seeds that do not germinate may possess dormancy.
Quality control
Once the TSCC have uncovered germination requirements of a collection to achieve greater than 75% germination, the germination test can be repeated approximately every ten years to ensure that the seeds in the seed bank are maintaining their viability.
Germination databasing
Once germination tests have been completed all the data is transferred from the paper test sheets to the TSCC database system and the test sheets are then archived. This data is publicly available from the TSCC Germination Database. The germination database is designed to provide you with a summary of all the tests that have been conducted on a collection and their respective successfullness. Searches can be conducted by selecting a plant family or genus.
For information on using our laboratory results in a non-laboratory setting, see interpreting the Germination Database for home use.
Seed Germination Database
The Royal Tasmanian Botanical Gardens is pleased to be able to place online the germination data recorded by the Tasmanian Seed Conservation Centre.
By making this data available we hope to aid those interested in regenerating and conserving Australia’s native flora and the global community investigating seed germination and dormancy behaviour.
The Germination Database is also supported by over 20 pages of content discussing the science of germination and seed dormancy and provides tips on applying laboratory techniques at home.
http://www.unaavictoria.org.au/files/Royal_Tasmanian_Botanical_Gardens.pdf
TSCC Germination Database
Citation: Wood, J.A. (2017).
RTBG Germination Database (June, 2017). https://gardens.rtbg.tas.gov.au/tscc-germination-database/

This work is licensed under a Creative Commons Attribution 3.0 Australia License.
Please send any feedback concerning the Germination Database via this form.
Further reading
Some related pages of interest…
-
Interpreting the Germination Database for Home Use How do you apply the laboratory based results of the Germination Database in the home? Read this to find out what the test conditions suggest you should try.
-
Tasmanian Seed Conservation Centre Tasmanian Seed Conservation Centre plays a central role in the conservation work of the RTBG. In the following pages we describe seed centre’s origins, it’s partners and what the seed centre does and why. We also provide a bit more background on the Germination Database.
-
Seed Germination Tests at the TSCC How are seed germination tests conducted at the Tasmanian Seed Conservation Centre?
-
What is Germination? Every viable (living) seed has the potential to become a plant. For this to happen, the seed must germinate. But what is germination?
-
What is Seed Dormancy? The subject of seed dormancy has been actively researched for at least 100 years, and has been known to exist for far longer. However describing exactly what seed dormancy is can be troublesome.
-
Acknowledgements and Disclaimer Acknowledgements for those involved in the development of the Seed Conservation Pages and Disclaimer for data provided by the TSCC Germination Database.
Interpreting the Germination Database for Home Use
Successful germination of wild plant species is often problematic. It is hoped that by providing access to the Tasmanian Seed Conservation Centre’s (TSCC) Germination Database we can provide some guidance as to what approaches will work best. Germination data can be sought from the database taxonomically, via the plant family or genus.

At the TSCC, seed germination requirements are investigated in laboratory conditions. However with a little effort the information in the Germination Database can be interpreted for germinating native seeds at home.
Please do not be put off by seemingly complex methods! It is relatively easy to germinate seeds of many native plant species at home, even those that possess dormancy, with no specialist equipment and little experience.
Germination test reports
Each report in the Germination Database contains the following information about the seed collection and its germination requirements. Those in bold will be of most interest to you:
- Genus and species
- Time and place seeds were harvested
- A TSCC accession number for banking purposes
- The date germination testing began
- Germination test result (total percentage of viable seed germinated)
- Germination rate (number of days it took for half of the final germination result to be acheived)
- Test conditions
- Who carried out the test
In addition, all reports include further explanation on the last page.
The most important things to note are:
- 1. The test conditions:
- For each report, the test conditions marked ‘recommended’ are those which the TSCC use to re-test the collection approximately every 10 years to monitor collection viability. These are also the germination conditions recommended to those requesting seeds from a TSCC collection. Although the ‘recommended’ test will generally yield the highest germination in minimum time, this is not always the case and looking at the response of seeds to the range of tests carried out will often be very revealing (see examples below).
- 2. The test results:
- Percentage germination results, along with germination rate, are used by the TSCC to flag optimal germination conditions across the range of tests.
Germination medium
You will notice that the TSCC sow seeds onto 1% agar. This is simply an opaque medium that keeps the seeds moist and allows initial germination to be visible. For the purposes of home growing, we recommend sowing seeds in pots or trays of a good commercially available seed raising mix. Such mixes are as good, if not better in many cases, as the agar media the TSCC use. Keep the seed mix moist, but not water-logged.
Germination temperature
The most important thing to note is the germination temperature (°C). This will give a general indication as to what time of the year to sow your seeds.
For example, consider the following germination test results, including germination rate, for Diplarrhena moraea (Iridaceae);

Diplarrhena moraea – germination test results, including germination rate
Diplarrhena moraea will clearly germinate over a wide range of temperatures but prefers lower temperatures. For rapid germination, seed should be sown outdoors in autumn, expected to germinate in winter and seedlings will be well established by the spring.
These results contrast with the germination behaviour displayed by lowland, understorey species belonging to the Pomaderris genus (Rhamnaceae). Germination of these species declines and stops above 20°C, showing definite restriction of germination to the cooler months of the year. Indeed Pomaderris species tend to grow in drier conditions compared to Diplarrhena species and seeds will therefore avoid germination if there is a chance of the surface soil drying out.
Compare the Pomaderris germination strategy with germination results for Eucalyptus brookeriana (Myrtaceae);

Eucalyptus brookeriana – germination test results, including germination rate
In the laboratory, germination of E. brookeriana was rapid across a very broad range of temperatures, indicating that in the field, germination will take place at any time of the year providing the soil is wet.
N.B. Do not worry if you are unable to recreate the constant temperature regimes used by the TSCC. Seeds will probably respond as well, if not better, to natural alternating temperatures. Results generated by the TSCC should be used merely as a guide to the best time of year to sow seeds for germination.
Germination photoperiod
You will notice that the TSCC uses a 10/14 hour photoperiod. This means that for 10 hours each day seeds are exposed to light and for the remaining 14 hours they are in darkness. This simply reflects the natural photoperiod reminiscent of spring and autumn in Tasmania, which is when the majority of Tasmanian seeds are expected to be germinating in the wild.
However, photoperiod is only relevant if seeds are on the soil surface and light is generally only important for the germination of small seeds (less than 4 or 5 mm in length).
At home, seeds greater than 5 mm in length can be sown under the soil surface and photoperiod ignored. Seeds less than 5 mm should be sown on or close to the soil surface and natural day / night photoperiods will be perfectly adequate for germination. A good technique is to surface sow small seeds and then lightly dress the pot with a sprinkling of small, but not fine, grit. This allows light to reach the seeds but prevents the seeds from being disturbed too much by watering and helps create a humid atmosphere at the soil surface.
If you suspect that seeds greater than 5 mm in size require light for germination, sow seeds both on and under the soil surface and note germination patterns.
Overcoming seed dormancy and stimulating germination
Does the germination report suggest that your seeds require treatment prior to sowing for germination, or additional germination stimulants once sown? If so, your seeds may exhibit dormancy.
Prior to sowing seeds:
A period of dry storage or dry after-ripening
A period of dry after-ripening may alleviate physiological dormancy. To achieve dry after-ripening at home, you may want to seal seeds inside a paper bag and store them in a warm (not hot), dry place for a number of weeks, for example, a north facing windowsill during summer, inside a boiler cupboard, close to a storage heater or on a veranda. Overcoming physiological dormancy can also be achieved.
Removal of seed covering structures
Removal of seed covering structures may alleviate physiological or physical dormancy. The TSCC advises that wherever possible, seeds are sown without covering structures such as husks and fruits.
N.B. It is vital that wet fruit and pulp is removed from around seeds soon after collection to prevent seed decay and reduced seed viability. Read more about the importance of drying seeds here.
Washing and soaking
Washing or soaking seeds may alleviate chemical dormancy. It may be necessary to soak seeds in water or detergent for some hours prior to sowing. Such pre-treatments may act to wash away germination inhibitors, and/or prevent significant mould developing around seeds.
Seed coat removal or chipping (scarification)
Seeds exhibiting physical dormancy will require scarification of the seed coat simply to allow seeds to absorb water. If possible, make a small incision into the coat of each seed using a scalpel, preferable away from the seed embryo. If the seed coat is too thick for this approach you might consider using a vice to crack the seed coat. Alternatively files used to sharpen saw teeth or a hand-operated drill can be used to penetrate the seed coat whilst the seed is securely fixed in a vice.
For examples of chipping seeds at the TSCC, see Germination Reports for Fabaceae species.
One common technique in tackling physical dormancy is to place dry seeds into a glass of just boiled water and leave it to cool. The heat causes the seed coat to crack and permits the intake of water.
Heat Shocking
Applying high temperatures for short durations has a similar affect upon seeds as scarification, but may also encourage germination of species that are not physically dormant. At the TSCC, a tray of sand or fine grit is pre-heated to 90 to 100°C in a conventional oven before a small paper or foil envelope of seeds is pushed into the sand. The tray is then placed back into the oven for about ten minutes. Remove the packet from the tray and allow to cool. Once cooled the seeds can then be sown.
Once seeds are sown:
Potassium nitrate
You will notice that many seeds have been found by the TSCC to respond to application of potassium nitrate (KNO3). However, along with many other minerals and nutrients useful to seeds/plants, KNO3will be present at adequate concentrations in commonly used seed raising mix therefore nothing additional is necessary.
Smoke solutions
Smoke is reportedly an effective chemical agent for terminating dormancy / triggering germination in a wide variety of Australian native seeds1. For example, dormancy of Schoenia filifolia subsp. subulifolia (Asteraceae) was overcome by smoke-water, eliminating the requirement of light for germination2. The active component of plant- and cellulose- derived smoke has been identified as ‘karrikinolide’ (3-methyl-2H-furo[2,3-c]pyran-2-one)3 , but exactly how karrikinolide promotes seed germination is still unknown.
So far only one collection at the TSCC has exhibited a significant response to smoke (Ozothamnus lycopodioides, Asteraceae), and upon re-testing this is now in question.
For home use, smoke solution can be purchased in two forms:
- Smoked Vermiculite: ‘Regen 2000 Germinator’ is a dry granulated smoke-infused product specifically designed for use on seed trays.Small quantities, sufficient for small-scale use, can be obtained from Nindethana Seed Service.Mr Fothergill’s Seed Australia sell Seed Starter Granules for wildflowers, which may be similar to smoked vermiculite.
- Smoked Paper Disks: Seeds are soaked in a container containing one of the disks for 24 hours prior to sowing.These disks are also available from Nindethana Seed Service.
For some species, application of smoke solution after one or two seasons might yield better results. The concentration of smoke solution used should also be considered as high dosages can be toxic or at least inhibitory.
References:
- Merritt DJ and Dixon KW. 2003. Seed storage characteristics and dormancy of Australian Indigenous plant species: From the seed store to the field. In: Seed conservation: Turning Science into Practice. RD Smith, JB Dickie, SH Linington, HW Pritchard and RJ Probert, eds. Royal Botanic Gardens Kew, 807-823.
- Plummer JA, Rogers AD, Turner DW and Bell DT. 2001. Light, nitrogenous compounds, smoke and GA3 break dormancy and enhance germination in the Australian everlasting daisy, Shoenia filifolia subsp. subulifolia. Seed Science and Technology 29: 321-330.
- Flematti GR, Ghisalberti EL, Dixon KW and Trengove RD. 2004. A compound from smoke that promotes seed germination. Science305: 977.
Acknowledgements & Disclaimer
Disclaimer
The seed dormancy and seed germination requirements described in these pages represent a brief summary of our current understanding of seed biology. The pages were written between October 2008 and January 2009. Research continues both at the TSCC and worldwide and further insight into this area is certain.
In addition to the TSCC Germination Database, we have attempted to deliver some current understanding of dormancy mechanisms and conditons that permit or restrict germination, in order to help you germinate seeds at home and elsewhere.
Acknowledgements
We would like to acknowledge the huge amount of help provided by the volunteers of the seed bank in the processing of collections and conducting of germination tests at the TSCC. Without their time and efforts much of what has been achieved would not have been possible.
Many thanks to you all.
Seed Conservation & Germination Pages
The conservation pages were written by Dr Gemma Hoyle and James Wood with the assistance of Lorraine Perrins (RTBG Nursery) and Micah Visoiu (DPIW).
We also acknowledge the help and feedback we’ve received in the development of the TSCC Germniation Database. Particularly Kirstine Manger and other staff at Kew’s Seed Conservation Department in the UK, and Leahwyn Seed and Amelia Martyn at the Mount Annan Botanic Gardens seedbank.

Gemma Hoyle has a PhD in Australian seed conservation biology.
Before coming to Australia, Gemma Hoyle spent 2.5 years working for RBG Kew’s Seed Conservation Department (known internationally as the Millennium Seed Bank Project) in the UK, where she uncovered dormancy alleviating treatments and germination requirements for seeds from all over the world. Gemma was recently awarded a PhD from the University of Queensland for her work in Australian Seed Conservation Biology. In particular, her research has broadened the understanding of the ecological significance of physiological dormancy and germination requirements of Australia’s native forbs for increased use and more effective conservation. Currently based in Canberra, Gemma is looking forward to applying her expertise to the research and conservation of Australian alpine seeds.
James Wood in the Nursery
James Wood is the Co-ordinator of the Tasmanian Seed Conservation Centre and has worked in and around seedbanking for 17 years. He took on his current post in December 2005 after working at RBG, Kew’s Seed Conservation Department for 7 years. Prior to that he held a horticultural support post for the Kew seedbank for 6 years. His first experience of seed science was as a student when he spent his industrial placement year working in research at the Kew seedbank.
Running and overseeing seedbank germination tests for about 11 years, James has a broad background and interest in the difficulties of wild species germination. He also has an interest in the effective recording and analysis of this data.
If you would like to contact either Gemma or James on the content of these pages or for other matters please use our feedback form.